AWS の ELB はとても高機能だしマネージメントでメンテコストもほとんど無く死角がないのだけど、固定 IP で使えないのがイタイという時がある。
今日日 CNAME じゃだめで固定 IP で無ければならないとかそれはそれでアレなわけだけど、それがマストである、と言うことなら(大変大変大変不本意ではあるが) ELB を使わずに頑張って対応するしかない。
そこで、NGINX Plus をロードバランサーとして使いつつ、CDP で言うところの Floating IP パターンで、高可用性も担保する構成を考えてみる。
- 参考
LB に NGINX Plus を使ってみる
今回は LB として NGINX Plus を使ってみたい。と、いうのも 政治的な理由 通常の Nginx に追加して、セッションの持続化強化、ヘルスチェック、拡張された状況報告とオンザフライでのロードバランシングプールの設定変更など、魅力的な機能が揃っているから。
Proof of Concept
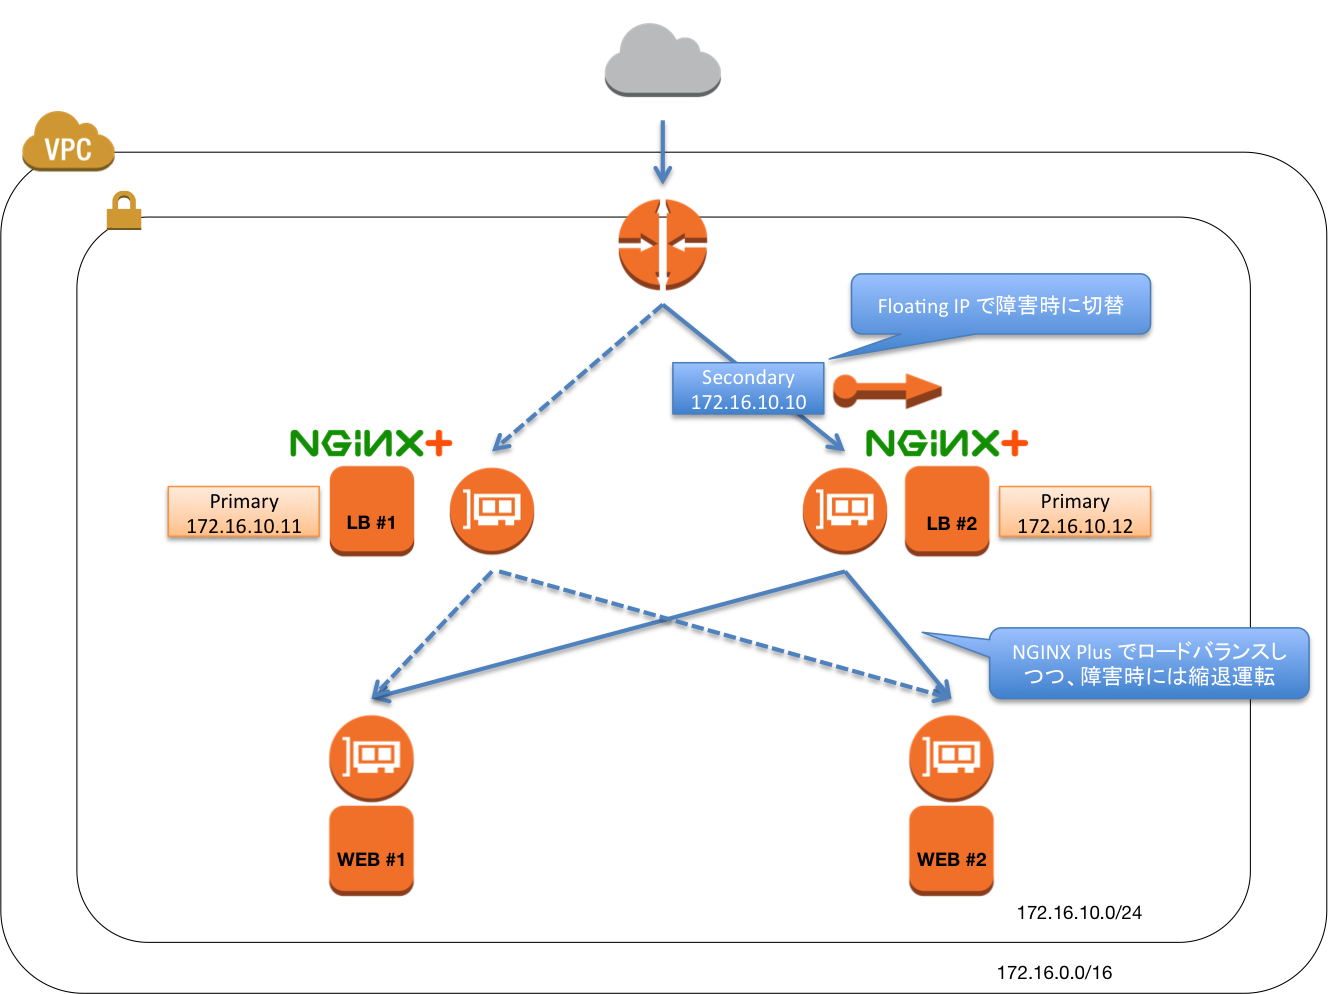
なんかどっかで見たような図になってしまったが…
構成
- LB
- CentOS 6.5(x86_64)
- NGINX Plus
- nginx-plus-1.7.3-1.el6.ngx.x86_64
- ec2-api-tools-1.7.1.0
- WEB
- CentOS 6.5(x86_64)
- httpd(正直何でも良い)
インスタンスの用意
- LB #1
- CentOS 6.5(x86_64)
- ENI #1
- Private IP: 172.16.10.11
- Secondary private IP: 172.16.10.10
- LB #2
- CentOS 6.5(x86_64)
- ENI #1
- Private IP: 172.16.10.12
- WEB #1, #2
- WEB #1
- Private IP: 172.16.10.21
- WEN #2
- Private IP: 172.16.10.22
- WEB #1
片方の LB に、Secondary private IP: 172.16.10.10 を付けるのがミソ。
NGINX Plus 導入
通常通り、NGINX Plus を導入する。既に導入済みの AMI インスタンスもあるが、今回は CentOS のインスタンスに新規に導入するとしましょう。
- この辺からリクエストして頂ければ・・・
手順はサイトの NGINX repository setup instruction を見れば何となく雰囲気はつかめる。CA.crt, nginx-repo.crt, nginx-repo.key の 3つを /etc/ssl/nginx 配下に置く。どれか一つを忘れてもだめっぽい。
[root@ng-lb-1 ~]# mkdir /etc/ssl/nginx/
[root@ng-lb-1 ~]# cp ~/CA.crt /etc/ssl/nginx/
[root@ng-lb-1 ~]# cp ~/nginx-repo.crt /etc/ssl/nginx/
[root@ng-lb-1 ~]# cp ~/nginx-repo.key /etc/ssl/nginx/
[root@ng-lb-1 ~]# yum install -y nginx-plus
[root@ng-lb-1 ~]# cat /etc/nginx/conf.d/default.conf
upstream backend {
    server 172.16.10.21;
    server 172.16.10.22;
}
server {
    listen       80;
    server_name  _;

    access_log  /var/log/nginx/access.log  main;

    location = /favicon.ico {
        log_not_found off;
    }

    proxy_set_header Host $host;
    proxy_set_header X-Forwarded-For $proxy_add_x_forwarded_for;
    proxy_set_header X-Forwarded-Host $host;
    proxy_set_header X-Forwarded-Server $host;
    proxy_set_header X-Real-IP $remote_addr;

    location / {
        proxy_pass http://backend;
        health_check interval=5 fails=1 passes=1 uri=/;
    }
}
こんな感じでとりあえず OK。せっかく Plus なのでヘルスチェックも入れてみた。SSL は今回とりあえずおいておく。
ちなみに NGINX Plus のロードバランサ機能は真面目にやろうとすると、結構盛りだくさんな機能があることが分かるがまずはこんなところであろう。
[root@ng-lb-1 ~]# chkconfig nginx on
[root@ng-lb-1 ~]# service nginx start
サービス有効化も忘れずに。
EIP IP 自動付け替え設定
EIP の自動付け替えには ec2-api-tools を使う。CentOS だと当然のことながら最初から入っていないので、手動で導入してやる必要がある。(正直メンドイ…)
[root@ng-lb-1 ~]# yum install -y unzip java-1.6.0-openjdk
[root@ng-lb-1 ~]# mkdir -p /opt/aws
[root@ng-lb-1 ~]# curl -LO http://s3.amazonaws.com/ec2-downloads/ec2-api-tools.zip
[root@ng-lb-1 ~]# unzip ec2-api-tools.zip
[root@ng-lb-1 ~]# mv ec2-api-tools-1.7.1.0 /opt/aws
先に紹介した Developers.IO のネタ を基に、少々 CentOS 用設定を加える。
[root@ng-lb-1 ~]# curl -LO http://media.amazonwebservices.com/articles/vip_monitor_files/vip_monitor.sh
[root@ng-lb-1 ~]# chmod a+x vip_monitor.sh
vip_monitor.sh
#!/bin/sh
# This script will monitor another HA node and take over a Virtual IP (VIP)
# if communication with the other node fails
export JAVA_HOME=/etc/alternatives/jre
export EC2_HOME=/opt/aws/ec2-api-tools
export AWS_ACCESS_KEY=XXXXXXXXXXXXXXXXXXXX
export AWS_SECRET_KEY=XXXXXXXXXXXXXXXXXXXXXXXXXXXXXXXXXXXXXXXX
export EC2_URL=https://ec2.ap-northeast-1.amazonaws.com
export PATH=$PATH:$JAVA_HOME/bin:$EC2_HOME/bin

# High Availability IP variables
# Other node's IP to ping and VIP to swap if other node goes down
HA_Node_IP=172.16.10.12
VIP=172.16.10.10

# Specify the EC2 region that this will be running in
REGION=ap-northeast-1

# Run aws-apitools-common.sh to set up default environment variables and to
# leverage AWS security credentials provided by EC2 roles
#. /etc/profile.d/aws-apitools-common.sh

# Determine the instance and ENI IDs so we can reassign the VIP to the
# correct ENI.  Requires EC2 describe-instances and assign-private-ip-address
# permissions.  The following example EC2 Roles policy will authorize these
# commands:
# {
#  "Statement": [
#    {
#      "Action": [
#        "ec2:AssignPrivateIpAddresses",
#        "ec2:DescribeInstances"
#      ],
#      "Effect": "Allow",
#      "Resource": "*"
#    }
#  ]
# }

Instance_ID=`/usr/bin/curl --silent http://169.254.169.254/latest/meta-data/instance-id`
ENI_ID=`/opt/aws/ec2-api-tools/bin/ec2-describe-instances $Instance_ID --region $REGION | grep eni -m 1 | awk '{print $2;}'`

echo `date` "-- Starting HA monitor"
while [ . ]; do
  pingresult=`ping -c 3 -W 1 $HA_Node_IP | grep time= | wc -l`
  if [ "$pingresult" == "0" ]; then
    echo `date` "-- HA heartbeat failed, taking over VIP"
    /opt/aws/ec2-api-tools/bin/ec2-assign-private-ip-addresses -n $ENI_ID --secondary-private-ip-address $VIP --allow-reassignment --region $REGION
    /sbin/ifconfig eth0:1 $VIP netmask 255.255.255.0
    pingresult=`ping -c 1 -W 1 $VIP | grep time= | wc -l`
    if [ "$pingresult" == "0" ]; then
      echo `date` "-- Restarting network"
      /sbin/service network restart > /dev/null 2>&1
    fi
    sleep 60
  fi
  sleep 2
done
- 見ることろ
- 冒頭の大量の
exportは/etc/profile.d/aws-apitools-common.shをコメントアウトして読み込ませないので追加している。(これって Amazon Linux じゃないと存在しないよね・・・) HA_Node_IP=172.16.10.12は、対向側になる LB ホストのPrivate IPを指定するVIP=172.16.10.10はSecondary private IP、つまり VIP。- 49行目あたりの
/sbin/ifconfig eth0:1 $VIP netmask 255.255.255.0は、基記事でも説明されているとおり。 - あと、ec2-api-tools への PATH がベタ書きされていたので改修した。
- 冒頭の大量の
[root@ng-lb-1 ~]# echo '@reboot /root/vip_monitor.sh >> /var/log/vip_monitor.log' | crontab
[root@ng-lb-1 ~]# /root/vip_monitor.sh >> /var/log/vip_monitor.log &
ここまでどちらの LB も共通。勿論2台とも行う。
EIP のアタッチと VIP の有効化
EIP を LB #1 の ENI に Associate する。すると選択肢に 172.16.10.10 があるはずなので、それで決定する。
それからまだ VIP が有効化されていないはずなので、LB #1 で VIP を起こすコマンドを叩いておく。
[root@ng-lb-1 ~]# ifconfig eth0:1 172.16.10.10 netmask 255.255.255.0
確認
ログを tailf とか、作業クライアントから EIP に向けて ping しつつ、LB のインスタンスや WEB のインスタンスを落としてみる。
[root@ng-lb-1 ~]# tailf /var/log/vip_monitor.log
[root@ng-lb-2 ~]# tailf /var/log/vip_monitor.log
Sun Aug 10 02:09:53 JST 2014 -- HA heartbeat failed, taking over VIP
RETURN  true
こんな感じのログが出てれば切り替わりが出来ている。
また、裏の WEB は index.html に これは WEB #1 です、これは WEB #2 です みたいなものを置いておくとテストしやすい。
おわりに
環境を構築してから気がついたのだけど、NGINX plus には nginx-ha なるパッケージが存在する様だ。
どうやら実装は corosync + Pacemaker で、EIP の切替もよしなにやってくれるとのこと(…!)
と、言うわけで AWS 環境で使うならこっちの方法を使う方が自前でしこしこ用意するより楽かもしれません。(今度リベンジする、かもしれない…)